


In one line: An aluminium profile machine cabinet (Machine Cabins) uses 40 series T slot aluminium profile (T Slot Aluminium Profile) for the frame, is assembled with built-in connectors, corner pieces, hinges and caster mounting plates, and is bolted throughout — no welding. Selection follows one rule: define the load first, then the slot width and cross-section. From drawing approval to delivery there are five fixed steps.
1 Six parts make up one cabinet
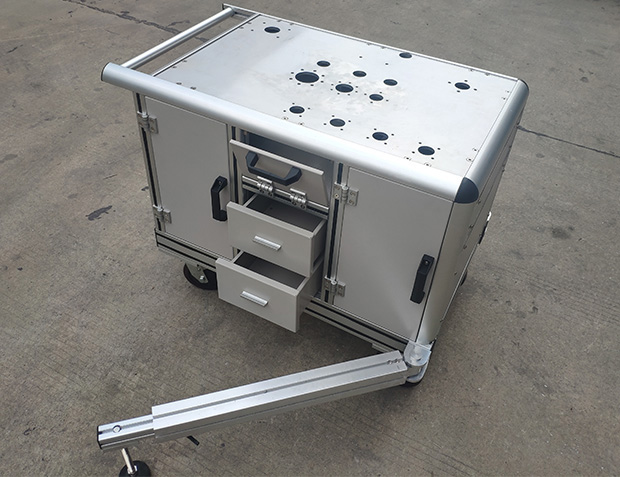
A standard aluminium profile cabinet breaks down into six parts, each with its own profile and hardware:
1. Frame — columns and beams in the Aluminium Profile 40 (Aluminium Profile 40) series, main section 40 X 40 Aluminium Extrusion, closed at the four corners with large-radius three-way corner pieces;
2. Worktop — a single sheet of Panel Aluminium, drilled with several sets of mounting holes to match the equipment feet, fixed around the edge with Countersunk Head Screws;
3. Doors — double doors on two sides, hung on an Aluminium Profile Hinge or Metal Hinge, fitted with a Handle and Door Stopper;
4. Interior — an instrument bay above and two drawers below, the drawers running on slides in a T Slot Drawer arrangement;
5. Base — swivel Casters with brakes, bolted to the bottom beams through caster mounting plates;
6. Moving gear — a detachable tow bar at the front on a flange connection, stored separately when removed, plus a round tube push handle on top.
This is also a common way to build an Equipment Rack, used for control cabinets, instrument carriers and mobile workstations. The structure carries load steadily, can be modified later, and needs no hot work.
2 Connections: four types, all bolted
An aluminium profile cabinet is not welded. The connections fall into four groups, each with its own load path and hardware logic:
| Connection type | Where | Typical hardware | Selection notes |
|---|---|---|---|
| Frame joints | Column-to-beam, corner transitions | Built-In Connectors, Angle Slot Connector, Corner Pieces 40 X 40, three-way corner pieces | Stress concentrates at corner transitions — prefer three-way corner pieces for a clean look and even load path |
| Panel fixing | Worktop, doors, side panels | T-Bolt, flat slot nuts, Flat Sealing Groove Strip, Sealing Profiles | Panels lock into the profile slot; press sealing strip into panel joints for dust protection and finish |
| Moving parts | Door leaves, drawers | Aluminium Profile Hinge, Metal Hinge, drawer slides, Handle | Choose by door weight and opening frequency; heavy doors suit a metal hinge |
| Base and mobility | Bottom beams, tow bar | Casters, caster mounting plates, End Connection Plate, Foot Connector | Match caster load rating to total cabinet weight; the tow bar uses a flange connection for easy removal |
Every joint is bolted, so changing the door swing, adding panels or extra shelves later never requires hot work.
3 Profile selection: load first, then slot width and section
Cabinet selection follows a single rule: define the load, then the slot width and cross-section.
| Working condition | Slot width | Recommended section | Notes |
|---|---|---|---|
| Standard cabinet columns and top beams | 8 mm | 4040 | 4040 is the main cabinet section, with mature accessory support |
| Long-span beams, heavier equipment | 8 mm | 4080 (40 80 Aluminium Extrusion) | Upgrade when span or load increases, to control deflection |
| Drawer and instrument bay sub-frame | 8 mm | 3030 (30 Series Aluminium Extrusion) | Sub-frames carry no primary load; lighter sections keep cabinet weight down |
| Heavy load or vibrating equipment | 8 mm and above | Upgrade section and connectors together | Use End Connection Plate or Built-In Connectors at heavy nodes and add reinforcement plates |
Material is mainly 6063-T5, finished in silver anodizing (Anodizing), which balances corrosion protection and appearance. Aluminium Profile Accessories are supplied complete per assembly unit, so work is not held up waiting for parts.
4 From drawing to finished cabinet: five steps
5 Four things to confirm before ordering
Put these four items into the requirement sheet and the drawing can be signed off in one pass:
- ✔ Equipment foot size and weight — determines worktop hole positions and beam section;
- ✔ Door and drawer layout — swing direction and service opening positions drawn in advance;
- ✔ Mobility — choose swivel casters with brakes, and confirm whether a tow bar is needed;
- ✔ Finish and appearance — silver anodizing is the standard treatment; special environments confirmed separately.
Chengdu Zhuanchuang Aluminium Co., Ltd. supports the whole chain from concept design to finished cabinet delivery, supplying profiles and aluminium profile accessories from one source and cutting out intermediate links.
6. FAQ
Q: What is the difference between an aluminium profile cabinet and a sheet metal cabinet?
A: An aluminium profile cabinet is built from T slot aluminium profile and bolted together, so resizing, cutting a door opening or adding a shelf needs no new tooling. A sheet metal cabinet has fixed dimensions and any change means new blanks and welding. The aluminium profile route suits small batches, many variants and equipment that will be modified later.
Q: How many types of hardware does one aluminium profile cabinet need?
A: A standard build covers five groups: frame connectors, panel fixings, hinges and handles, casters and foot connectors, end covers and end caps. List them by assembly unit and the set can be supplied complete. Buying profiles and hardware from the same source avoids slot systems that do not match.
Q: How do you stop beams bending on a heavy aluminium profile cabinet?
A: Calculate the section from equipment weight and span; move from 4040 to 4080 when span or load grows, upgrade corner pieces at heavy nodes to End Connection Plate or Built-In Connectors, and add reinforcement plates where needed. Load figures should be taken from the manufacturer’s technical calculation sheet.
Post time: Oct-21-2026